Five Simple Techniques to Inject Creative Vision Into Your Photography
- Court Whelan, Ph.D.

- 11 minutes ago
- 6 min read

We've all been there--our photos start to look the same, and it feels like we're in a familiar pattern. There's nothing wrong with honing your style, but sometimes we need a little creative injection to give at least some of our photos a different look.
This article is about just that--five simple techniques to add a little creativity in your photography, no matter what the subject might be. This one goes for wildlife, landscape, travel, and beyond!
Exaggerate Your Composition (Break the Rule of Thirds on Purpose)
You already know the classics: rule of thirds, phi grid, leading lines, yadda yadda. Great tools. But creative vision may show up the moment you push those rules to an extreme.
How to do it
Identify the dominant element of your scene—sky, water, meadow, forest, negative space, whatever feels big.
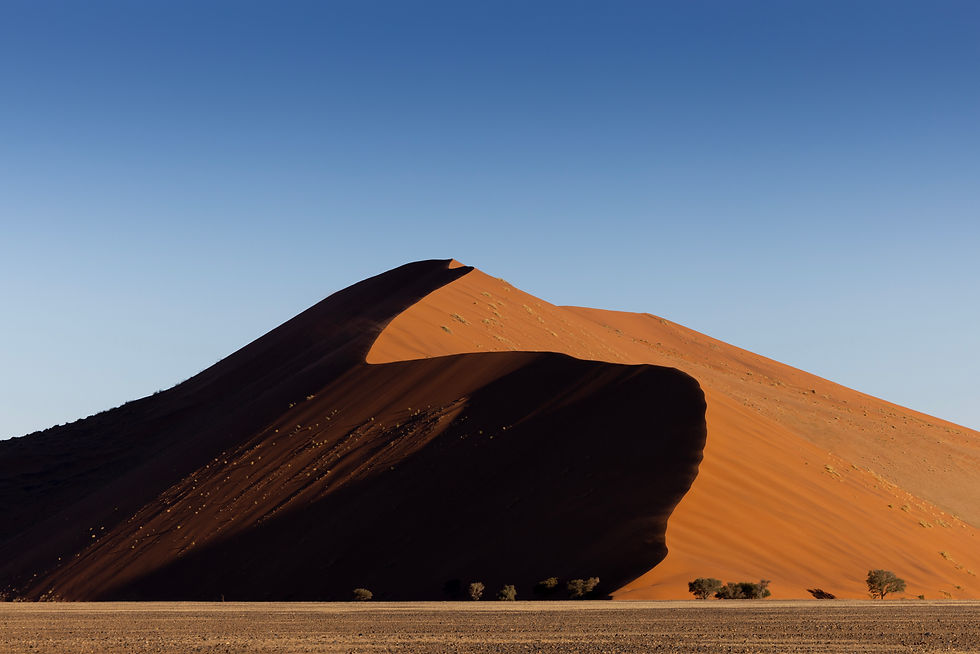
Instead of placing your horizon or subject on a third line, shove it almost to the edge of the frame (example below from the deserts of Namibia).
Think “rule of tenths,” not thirds.
Or, let the important element take over 90% of the photo, and leave the rest as a deliberate sliver.

When it works best
Huge, grand scenes: towering waterfalls, braided rivers, endless dunes, massive skies.
Wildlife in landscape: put the animal tiny and deep in the frame to highlight scale.
Why it feels creative
Your viewer’s eye expects the subject to sit neatly on an intersection point. When you stick a tree in the lower corner instead, you create tension. The viewer has to search—and then the “aha!” moment makes the photo stick.
Try this today: Next time you see a dramatic sky, place the land as a thin strip at the bottom. Or flip it: massive foreground texture with only a whisper of sky.

Use Intentional Motion Blur (Slow Shutter = Instant Mood)
Most photographers are trained to freeze action. That’s fine… until you want your image to feel like it’s breathing.
Intentional motion blur comes in two flavors, and both are ridiculously fun.
A) Blur the subject, keep the scene steady
Set a slower shutter than you normally would.
Rough range: 1/10 to 1/80 sec, depending on subject speed.
Hold the camera steady.
Let the animal/subject move through the frame.
Example: A cheetah running where the legs blur but the body stays recognizable. Or polar bears sparring with paws streaking motion.
B) Blur everything by moving the camera
Go slower: ½ sec to ~1/20 sec.
Press the shutter and move the camera intentionally:
Pan left–right
Tilt up–down
Rotate for a swirl effect
Example: Forest scenes become painterly streaks. Grasslands turn into ribbons of color. It’s like turning a landscape into a moving memory.
Why it feels creative
Blur is usually labeled a “mistake.” Doing it on purpose turns it into style. We see a lot of photos and a lot of videos in today's world. This technique bridges the gap, in a way, giving a photo a more video-like look, initiating some intrigue by the viewer.
Try this today: Photograph runners, waves, wind-blown trees, or even cars on a street corner. Give yourself 10 frames where blur is the goal. "Perfect" blur is subjective to the artist but also determined by the speed of the subject's movement. Practice makes perfect and arms you with intuition going forward.

Shoot From a Top-Down Perspective
Top-down shots are simple, but they work because they show the world from a viewpoint we almost never see.
How to do it (smartphone version)
Find a scene full of texture, pattern, or repetition:
Market produce
Spices in bowls
River rocks
Wildflowers
Anything piled, clustered, or layered
Hold your phone perfectly flat, lens facing straight down.
Use the volume button as your shutter for one-hand reach shots.
How to do it (camera version)
Use a wide lens if you can.
Hover directly above your subject.
Keep the camera level so everything is equidistant from the lens and rely on auto-focus.
Aim for f/8 for great sharpness and definition.
Why it feels creative
You’re stripping away horizon and context. What’s left is pure design—shape, color, geometry. A barrel of blueberries becomes an abstract painting. Plus, since everything is more or less equidistant from your lens, you'll have great sharpness, making colors and textures really pop.
Try this today: Try a local farmer's market, plant nursery, or even grocery store. Seriously. Find any display table, shoot top-down, and watch how quickly your brain starts seeing patterns everywhere.

4) Go Black and White Before You Shoot
Yes, you can convert later. But setting your camera to black and white in the field changes how you see. It’s like putting on different glasses for the day.
How to do it
Switch your camera or phone to monochrome mode.
Look for:
High contrast light
Strong shadows
Bold shapes
Texture and grit
In editing, lean into contrast:
Darken blacks
Boost whites
Let it get moody
When it shines
Harsh midday light you’d normally avoid.
Urban scenes, temples, forests, stormy landscapes.
Anything that feels dramatic or graphic.

Why it feels creative
Color can be distracting. Black and white forces the photo to concentrate on the lines, contrast, and emotion. And when you commit to it while shooting, you start composing for that mood.
Try this today: Give yourself one hour (or one whole walk) in black and white only. You’ll come back with a totally new set of instincts.
5) Tilt Your Horizon (Because Level Isn’t a Law)
We’re all trained to straighten horizons like our lives depend on it. But creative vision loves a little rebellion.
How to do it
Find a natural line in the scene:
A leaning tree
A temple staircase
A street corner
Rotate your camera so one edge of the frame matches that line.
Let the rest of the scene tilt.
Why it feels creative
A tilt creates energy. It makes still scenes feel alive, eerie, or kinetic—especially in forests, markets, and places with chaotic visual rhythm.
Try this today: Next time you’re in a forest, line your frame with a leaning trunk so it feels “upright,” and let the world fall diagonally around it. You’ll get instant tension and drama.
Bonus Technique: Commit to Spot Metering for a Full Day (Let the Light Get Weird)
Spot metering is usually treated like an emergency tool—something you flip on when your camera is confused and you need to rescue exposure on a subject. But used deliberately, it becomes a creativity machine.
Quick refresher: what spot metering does
Most of us shoot in evaluative/matrix metering, where the camera reads the whole frame and averages the light to create a “normal-looking” exposure.
Spot metering ignores all that.It measures light from only a tiny area in the center of the frame (your “spot”) and exposes just for that. Everything else gets dragged along for the ride—sometimes into glory, sometimes into chaos, often into something wonderfully unexpected.
How to practice it (the creative way)
Set your camera to spot metering.On most cameras this is in the metering mode menu (often shown as a small dot inside a circle).
Leave it on for an entire walk, shoot, or day.Not forever—don’t sabotage a once-in-a-lifetime safari—but long enough that your brain starts to think differently.
Place your subject in the dead center while shooting, because that’s where your exposure is being calculated.
Expect dramatic exposure swings.
Subject in shadow? The camera brightens everything to expose that shadow correctly.
Subject in bright sun? The camera darkens the whole scene to protect those highlights.
Shoot a bit wider than usual.This is the trick that keeps spot metering from forcing boring center compositions.
Crop later for composition.After you’ve captured that funky, subject-based exposure, you can reframe to rule-of-thirds… or exaggerated composition… or anything else you want.
What kinds of scenes this shines in
People photography in tricky lightThink street scenes, markets, temples, or travel portraits where faces move between sun and shade. Spot meter on the face, and let the background fall where it wants.
Backlit wildlife or silhouettesMeter on the animal and the sky might blow out into a dreamy wash. Meter on the sky and the animal becomes a graphic silhouette. Both can be rad, depending on your intent.
High-contrast landscapesSnowfields, deserts, harsh midday light, shafts of forest sunlight—spot metering can make your photos feel more dramatic because it refuses to average things out.
Why it feels creative
Spot metering forces you to stop making “safe” exposures.
Instead of your camera politely balancing everything, it creates visual bias—one part of the frame becomes “correct,” and the rest bends into mood. This can lead to surreal brightness, deep shadows, spotlight effects, natural vignettes, and drama you wouldn’t invent on purpose.
A simple assignment to try
Next time you’re out with a camera:
Turn on spot metering.
Spend one hour photographing only:
faces, or
a single animal, or
a repeating street/market scene.
Don’t “fix” the results in the field. Let exposures be bold.
Crop later to rebuild your compositions.
You’ll come home with a batch of images that look like you were seeing rather than just recording—and that’s exactly what creative vision is.

Bringing It All Together
You don’t need to use all five techniques on every shot. Think of them like spices: some scenes want a pinch, some want the full curry.
The bigger point is this—creative vision isn’t a mysterious talent. It’s something you can practice deliberately. If you’ve been feeling stale, bored, or like your photos are starting to look like everyone else’s… pick one of these techniques and go play.
Photography is art. Art is curiosity. And curiosity is a muscle you need to train.
Hope you enjoyed and remember, if you enjoyed this, please consider sharing/forwarding with a friend! Also, if you enjoy these tips, consider tuning into my photo tutorial podcast, The Wild Photographer.
Thanks, friends!
Court


Comments